What would you do after building a slow Z80 machine? Build an even slower one, of course :)
Well, at least that's what I did after finishing the Z-One. The Z-Two is mainly a Z80 emulation experiment, and runs Z80 code at about 110000 instructions per seconds. Roughly equal to Z80 running at 0.8MHz clock. Its right on the borderline of useless, but not quite uselessly slow.
The machine itself is built only on 3 chips - ATMega micro-controller, SRAM memory chip, and an 8 bit latch for multiplexed address bus, as the ATMega does not have enough pins. The multiplexed address does make the memory access quite a bit slower, but being more of a curiosity experiment than anything else, that's not a big problem. Chibiterm is again used for VGA and keyboard. SD card for storage, and there is an auxiliary serial port, this time using second hardware UART that the ATMega micro-controller has.
I don't expect to build more than one of these, so my machine is wired up on perfboard. The Eagle files, including the PCB layout, are still available in git repository.

The features of the machine:
- ATMega1284P, running at 18.432MHz is the brains of the operation
- Emulates Z80
- All documented Z80 instruction set, at about 110000 instructions/sec at 18.482MHz ATMega clock
- Enough undocumented ones to pass all Frank Cringle's yaze tests
- Does not emulate undocumented flags 5 and 3
- No external interrupt capabilities
- Can physically address all 512K of memory, although currently only uses 64K for Z80 emulator
- Contains and provides boot loader, monitor, and CP/M binaries
- SD card interface and initialization
- Console port for Z80-ChibiTerm connection, using UART at 115200
- Heathkit H19 terminal emulation, with special key mappings for WordStar
- Auxiliary serial port connected to FTDI based USB-Serial converter
- SD card interface and initialization
- Provides interval timer with 10ms resolution
- CP/M 2.2 running, with maxed out storage on SD card (16x8MB drives). You need at least 256MB card.
- Integrated ChibiTerm
- The whole system runs from 3.3V, regulated down from 5V supply voltage. Uses less than 10mA
As you can see, with exception of the CPU speed, and power consumption, the features are pretty much the same as for Z-One. In fact, all the Z80 firmware code came straight from Z-One project and did not require any changes. Only the ymodem server program was modified a little for better time delaying to avoid receiver buffer overruns, and after that it works reliably at 19200 bps despite the much slower CPU speed.
Software
All software and Eaglecad files are available at my github repository, MIT licensed.
Hardware
Click on image below for full size schematics.
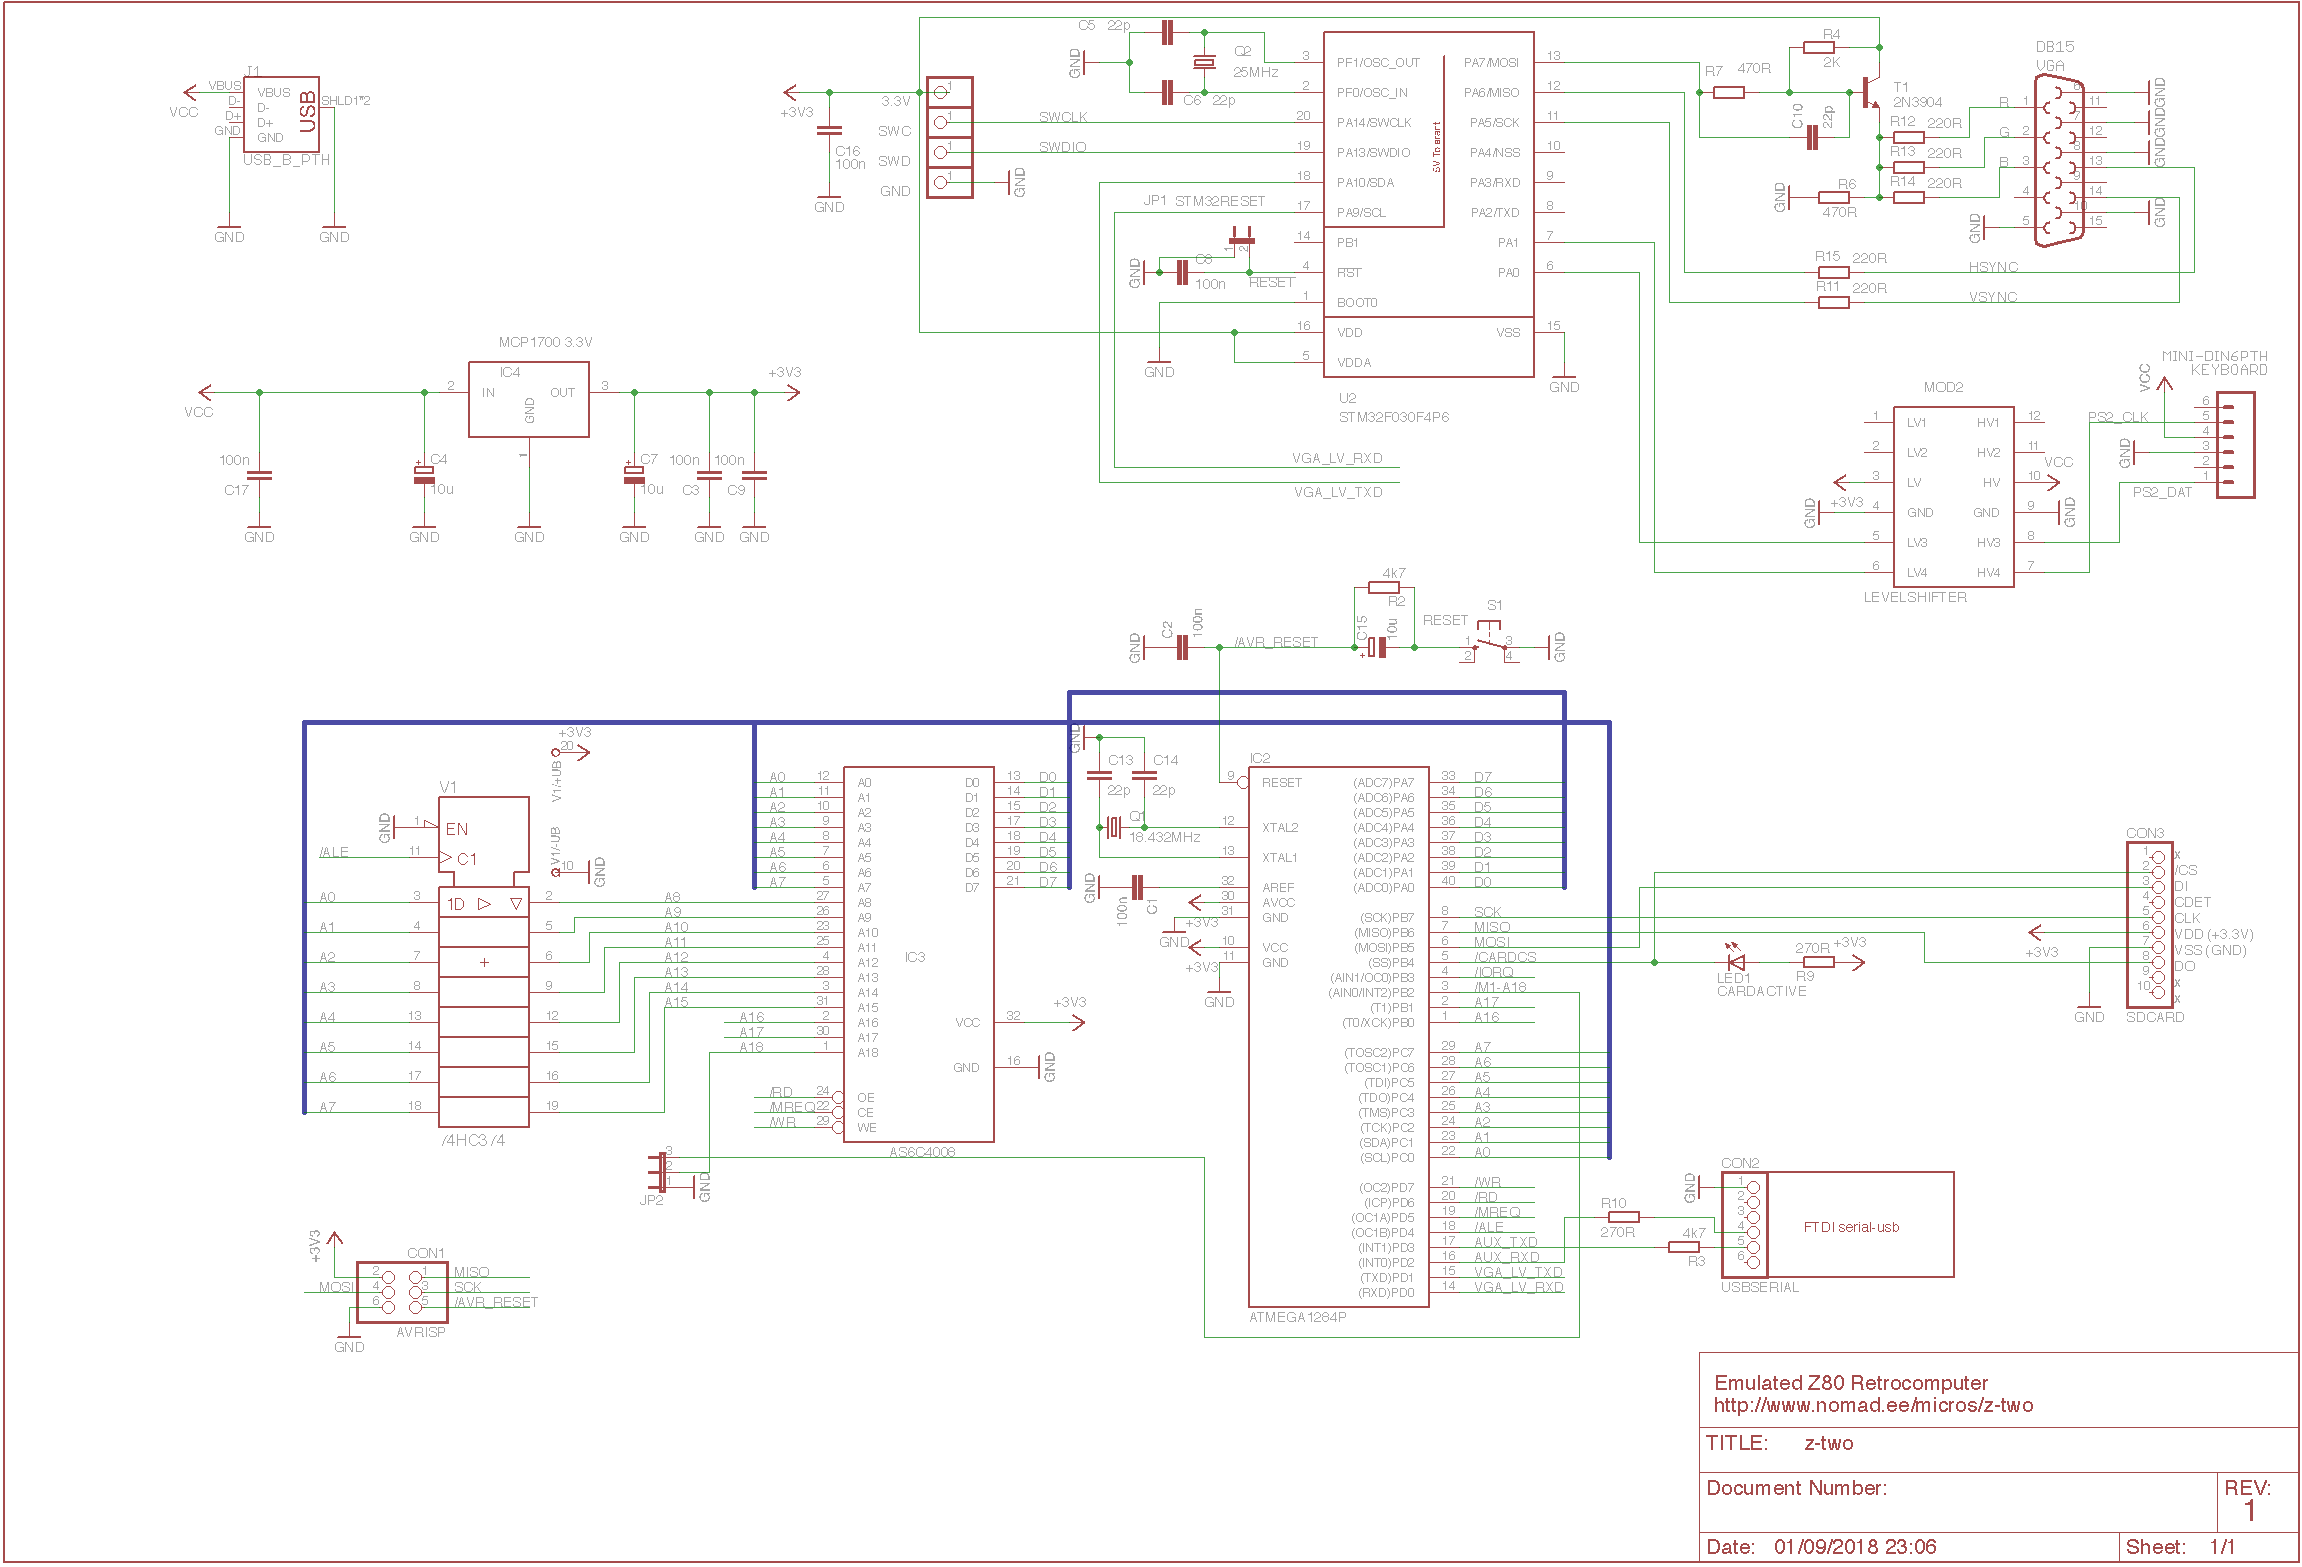
As you can see, it is basically Z-One with the Z80 and associated circuitry removed. Video and keyboard are still handled by Chibiterm part, built around STM32F030F4P6 micro-controller. One voltage regulator is more than enough to satisfy the tiny power requirement. Flashing the firmware into ST micro-controller and ATMega work exactly the same as for Z-One, so refer there for instructions, but keep in mind that the ATMega is now powered by 3.3V too, so make sure that the programmer is capable, and set up correctly, for 3.3V target.
I made the highest address pin dis-connectable from memory chip with jumper so that I could use it for early phase debugging. If you never plan to use the whole memory, you can free up 3 ATMega pins by wiring the memory chip address pins to ground. The freed up pins can be used to provide /M1, /INT, and /NMI signals for more complete hardware system emulation.
Currently, memory and I/O space are available as expected, except that high byte of address is multiplexed with low byte on port C. This means that all memory and I/O accesses start from high address byte output to port C, then pulsing the /ALE signal low and high again, then placing the lower address byte on port C. After that, /IORQ or /MREQ is asserted, followed by /RD or /WR and data access on port A. This should be good enough for wiring additional I/O chips to the system if you don't need external interrupts.
ATMega firmware
The ATMega firmware, of course, is mostly the Z80 emulation code. A block of I/O space from 0xA0..0xFF is internally handled, and does not result in external bus operation. The ports, from Z80 viewpoint, work mostly exactly as on Z-One. The aux serial is now permanently enabled, and if 'closed' by Z80 will be set to 115200 bps, mostly for emulator debugging. The handling of the I/O requests is much simpler, as the emulator simply stops while the ATMega services the I/O request.
Z80 emulation
Some ATMega specific tweaking was done by using register variables for most often used Z80 registers, but this can be disabled in z80.hpp via simple #define change. In a same place you can also enable/disable emulation debugging and profiling features. When running on ATMega, built with #define INSTRUCTIONDEBUG, each Z80 instruction is printed when executed, followed by dump of Z80 active register bank and flags. This output goes to aux serial port at 115200 bps, but starts out in disabled state. The output can be enabled and disabled by sending a character to the port. Emulation does run noticeably slower with INSTRUCTIONDEBUG enabled, even if output to aux is turned off, because it calls the debug output function at least once per Z80 instruction executed.
So whats with the posix stuff?
Well, as the yaze tests take a whole day to run on the emulated Z80, it was not practical to iron out
the bugs on ATMega. I did actually get it to run CP/M pretty good there before attempting full tests, but
then it was time to speed things up a little. So I basically created an emulated machine running on
linux or OSX, with SD card replaced with a big file in a normal file system. For getting the test program
to the emulator, the posix build (it produces executable called zemu) takes -l
The emulated speed is pretty awesome on the big machines, on my iMac that has 2.7GHz Core i5 it does over 150M instructions per second, an equivalent of Z80 running at more than 1GHz. Needless to say, this made running the Z80 instruction test suite much faster.
The 4 files - posixaux.cpp, posixconsole.cpp, posixmachine.cpp, posixmain.cpp - demonstrate how to port the Z80 emulator to some other platform. Not sure if anyone would want to do it, but its certainly easily doable.