There are multiple ways in which you can cut down on noise that a typical PC emits, some are more effective than others, and usually more costly as well. This doucument shows how to cut down on noise cost-effectively. Obviously, you can't expect miracles, but the results come cheap, fast and relatively painlessly.
UPDATE: I tried to cut down noise of my upgraded PC which currently runs with Duron, and I failed! I tried to replace fans with expensive Papst fans with RPM lowered to minimum that kept the temperature under control, but was not able to make the darn thing any quieter. It does not mean that the stuff below does not work - its just that some of the new PCs are so quiet that you can't make them better without really radical stuff. I finally settled on the original fans, cooler fan is running on 9 volts while the power supply fan still has the original thermistor - I just moved it from a power supply heatsink to power supply case. This means that the power supply runs quite a bit hotter, but the fan RPM is lower. Still, you don't get only all the good stuff, everything is a compromise. The CPU cooler is a cheap Spire 5C12B3, a quiet but not very efficent cooler. If you are into overclocking, you need something more powerful. The power supply has a Power Logic PL80S12M fan which is really, really quiet - highly recommended. However, the PSU itself is probably quite inefficent because it runs hotter than anything else I've had.
If you want no noise at all from your PC, then there are two ways to achieve this - get rid of all mechanically moving parts, or shield them heavily enough to block all noise. Both tend to be expensive alternatives. People have taken out all fans from the PC, replacing CPU coolers with large ones that can be cooled by convection air, and removing power supply covers and drilling cases to move more air over power supply. CPU stuff is a bit hard to do with modern, sizzling hot CPU's. The most troublesome part is, of course, hard disk. Several manufacturers produce noise-shielding cases that enclose the disk, some people build their own (even from concrete!). Cooling the HDD remains a problem in any case.
Another approach is to enclose the entire PC in a noise-proof box. This gives very good results but is expensive both in labor and materials. If you want your PC dead-quiet, then this is probably the best way to go. There are several projects on a web which give plans and suggest suitable materials.
And then there are measures that you can take to cut down the noise to more acceptable level. Here is a description of what I did during two hours in sunday evening.
Starting point.
An ordinary minitower AT case produced by Enlight, power supply has one fan, P5 processor has a cooler with a small fan attached to top, Fujitsu MPA3017AT hard drive. I measured the noise with measurement microphone from about half a meter away and saved the file.
First step, power supply.
I started from power supply. I opened it up, disconnected the fan and cut the connector from the leads. PCB had spare holes for +12V and +5V wires which I used to solder the fan wires. The fan is now connected between +5V and +12V, resulting in 7V differential between terminals. I have yet to see a 80x80mm fan that cannot start and run at that voltage, provided it is mechanically OK (turns easily if you turn it manually). I reassembled the power supply and applied pieces of 2mm bitumen dampening mats (relatively expensive stuff that you can get from car audio outfits, I had some at hand from a previous project) on all sides (don't cover the vent holes!). I attached some small pieces to back side near the screw holes as well, to provide some isolation from case. I then applied some electical tape to cornes where the metal still rattled when I knocked on power supply case. After that the case went 'thunk' instead of 'trinnnggg'. After reattaching PS to case, I tried it out and checked that the fan starts reliably. Everything checked out, the fan ran really quiet.
Second step, CPU cooler.
Next thing was CPU fan. It was attached to power supply with a
usual arrangement of four wires, connectors at each end, so that you can connect
it between PS and a drive. I disconnected the black fan wire from ground connector,
cut away insulation at red (+5V) wire and soldered it there. I then powered
it on, and the fan did not start. With a little push with finger, it started
and was running OK. Something had to be done. Brute force approach would be
using a power pot to regulate the voltage, but this means extra heat inside
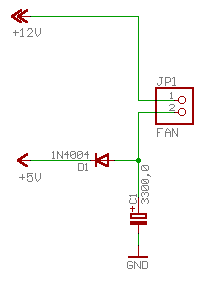
PC case, and I did not have a suitable pot either. So I built a starting circuit
instead:
 |
This simple circuit uses C1 to provide the initial kick for a fan. When the power is applied, C1 is empty. Fan sees it's + terminal sitting at 0V and full 12V is applied to fan. C1 then starts loading with current that flows through the fan until the voltage on it exceeds +5V plus forward voltage drop of D1 (about 0.7V). By that time the fan is already running and keeps running at remainging 6.3V until the power is removed and C1 discharges through D1. I soldered the cap and diode to wires and tried it out - and it worked fine. I then applied a generous amount of electrical tape for insulation and mechanical strength. You may want to use a diode with lower forwad drop to get extra 0.5V to fan, but I did not have any at hand. This method of reducing fan voltage is (rightfully so) deemed dangerous by many people, so you may want to check out the pwm motor control project for safer alternative. |
Third step, HDD.
What remained was HDD. As I was not going to build a box around it I just isolated it from case. I used two pieces of vinyl floor cover which I attached to HDD with original screws. I then hung the HDD couple of mm below the drive bay, using FDD screws and cable ties to secure the other end of plastic. To do this, the motherboard had to be removed along with it's mounting plate to get access to the screws. I had no good sound insulation materials at hand, so I left it as it was, just checked that it was no too loose, and could not knock itself silly against case when I shook the case. Sooner or later every PC needs to be transported, so better be prepared for it.
Last step, case damping.
I then used three pieces of damping mat for the sheet metal cover, and applied double layer to small area just in front of HDD where there was open FDD bay with a flimsy EMI cover. I then applied some to the plastic front cover as well, hoping that it will help to cut down the HDD whine. I then reassembled the motherboard and secured the CPU cooler 'starter' to the motherboard mounting plate with a cable tie, ensured that all cables were properly connected and tucked away so that they won't block the CPU fan. Lid on, and I was done.
The outcome.
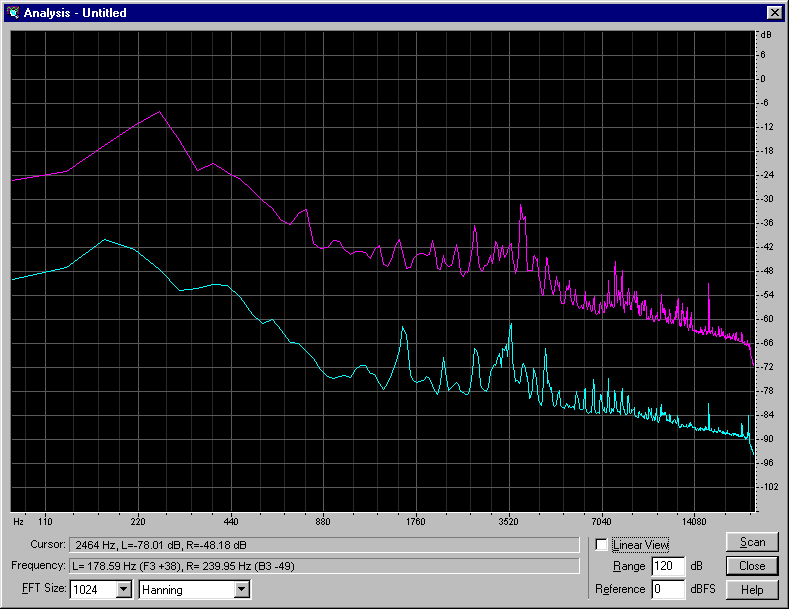
After turning the reassebled PC on for a first time, it was obvious that there was improvement. A lot of it, actually. I took another measurement using the same audio settings and microphone position. I then combined two 10 second fragments from recordings into one stereo signal and applied Syntrillium CoolEdit frquency analysis to resulting signal:

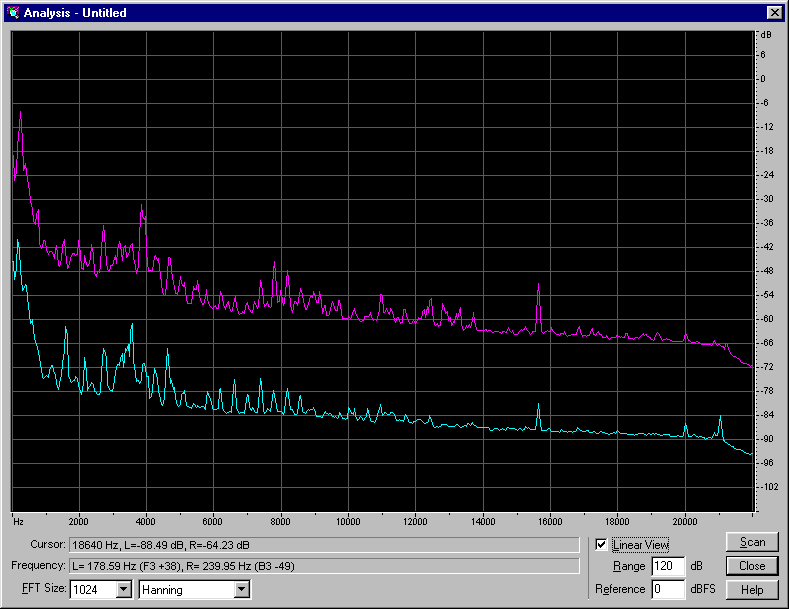
The original measurement result is shown in pink, as you can see the blue line is about 20dB down over the whole frequency range! the above graph shows frequency on logarithmic scale, a linear scale version is below:

Significant part of sharp power increase below 1000Hz comes from background noise.
So what does it mean? You have to download a recorded sound (1.5MB zip) to hear the difference. The most dramatic effect can be heard if you attach one stereo channel signal to end of another.
References
Syntrillium, makers of CoolEdit
Description of sound recording equipment used
Links to similar projects.
Case
noise reduction project by Larry Mingus
The Silent Personal computer