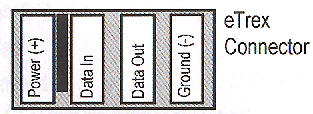
Data in and data out are RS232 compatible signals for talking to GPS. eTrex knows several protocols, including generic NMEA and Garmin proprietary protocol that can be used to upload/download waypoints, tracks and routes. eTrex also has a firmware in FLASH, so you can update it over the serial cable, too.
Power terminal is for attaching external power supply. eTrex needs 3V DC (specified maximum is 3.15V) and is smart enough to detect that the external power is available. You can leave batteries in the device, these also serve as backup if you accidentally pull the plug or something. My cheap DVM shows that eTrex takes 110..130mA from batteries discharged to 2.5V while scanning, and up to whopping 180 mA while scanning with backlight on.
The cable
eTrex uses a proprietary connector, and Garmin will not sell you just the plain connector. You can only buy ready-made cables from them.
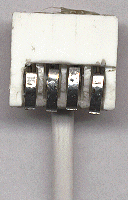
If you are in a hurry or just want to upgrade firmware it probably won't make sense to buy a cable or connector.I stumbled across the idea to use a piece of credit-card (or any suitable plastic) for hacked connector. You can see my version here. Just cut a piece of plastic to size so that it fits into connector slot just right. Use a dremel tool or whatever you can find to cut a slit for 'key' and drill three (or four if you want external power version) small holes over the contact pads. Drill two larger holes further away from contacts (inch or so) so that you can pull your cable through them. If you tighten it up, the holes will lock the cable so that you will not pull the wires out from the small contact holes.
The cable should be 'multi-stranded' so that you can twist the protruding ends into small bundles that contact with to connector pads. The resulting construction is pretty reliable if you get the contact end precise enough. If not, just do another one.
My friends created a better connector from PC power supply connector that coes to AT style motherboard. It has a correct pin spacing, and after some creative cutting, filing, and bending of pins they were able to create a connector that stays in slot and is quite strong mechanically. This is how it looks:
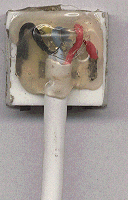
There is a blob of hot glue on top that fixes both the wires and pins, as the pins are reversed and bent out of shape.
Mobile power supplies
Two ways - easy, cheap and hot or complicated, expensive and cool. First one is straightforward linear supply that you can probably construct from scavenged parts lying in your junkbox.
Linear regulator
200mA does not seem to be a lot of current, but in car you have to make it from almost 14 volts, and this means that you have to turn about 11V*200mA=2.2W of power into heat. So you will need big fat components and lots of room to dump that heat. Building the thing into cigarette lighter plug is probably out of a question. Other than that, it will work just fine.
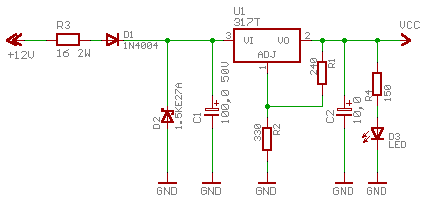
As you can see, it is 317T adjustable voltage regulator configured for 3V output using R1 and R2. C2 is a small output capacitor, if you want to make it bigger than 25,0 uF you also need a reverse protection diode over 317 regulator, so don't do that. R3,D1,D2 and C1 form a protection circuitry for voltage regulator. D1 protects the whole thing against reverse voltage spikes, D2 protects against excessive positive spikes and load dumps (both negative and positive spikes can reach voltages over 80V in your car!). R3 has several jobs to do, first it drops some of the input voltage to ease the load on regulator chip (D1 also drops about 1 volt). It also limits surge currents through D2, and limits short circuit current though the power supply to about 800mA.
D2 is TVS (transient voltage suppression) diode. These diodes act like zener diodes but can withstand huge currents in short bursts. Heavier artillery is generally recommended for vehicle power supplies, but as we only need about 200mA, we can use R3 to easy the life for TVS diode. TVS diodes have two critical thresholds - breakdown voltage and clamping voltage. First indicates at which reverse voltage the current starts to flow through the TVS, and clamping voltage is a maximum that can appear across it if the voltage continues to rise. TVS either survives the further increase in voltage, or explodes if it can't take any more. In car, you need to use one that has breakdown voltage over 14V, and clamping voltage below 40V (which is maximum specified for 317 voltage regulator). However, you will want to choose the one with clamping voltage nearest to 40V so that you will not try to eat all the garbage in car electrics alone. Have the other guy's TVS do the hard work for you.
D3 is power indicator led. Besides just looking cool, it gives some load to voltage regulator to keep its output voltage in control. These things have minimum specified loads at which they stay in regulation. All components will probably survive without extra cooling, but they sure get hot. The least you should do is to have some copper areas to help. One possible layout looks like this:
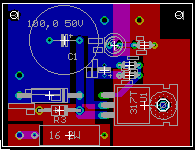
R3, D1 and U1 have copper areas under them. Heat can get to the copper through the leads that are soldered on top side. U1 should be attached to copper area by soldering the tab, or better yet, with small screw - this way you can put a small heatsink between the tab and copper plane.
Because of its simplicity and availability of parts, this design can have its uses when the power supply is needed quickly, or money is really tight. There is a better alternative, however.
Switching regulator
Due the size and ineffective operation, the linear regulator is not very cool :). Building a switching one from scratch is a real pain due the relatively hard to get parts (low ESR caps, swithcer chips, and inductors). There is an easy way out though.
First of all, some words about the power cable that you can buy from Garmin. It has a switching regulator built into cigarette lighter plug. It is based on rather exotic ADD MICROTECH chip AMC34063A in pretty much datasheet step-down configuration.
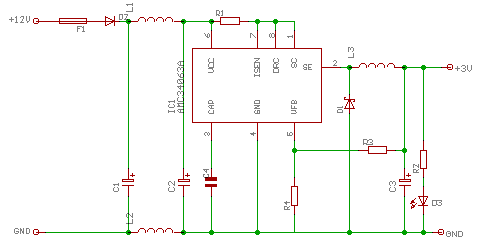
Here the designer has relied on two chokes to suppress HF noise, and has added diode to protect against reverse polarity spikes. However, the chip has 40V maximum input voltage and thus will probably die on power surges (like disconnecting battery with the engine running) unless the alternator has surge suppression built in. The AMC chip is actually ADD MICROTECH version of 'industry standard' MC34063 which is available from several manufacturers.
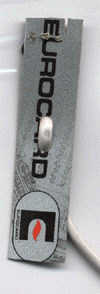
Here is a real good tip - there are $10 cigarette lighter plug type mobile phone chargers based on the same chip! In Estonia they are sold under TeleMark Pro Accessories brand, but they are really produced by Taiwan-based company Formosa Electronic Industries Inc. I opened mine up to see if there is a way to modify it for Garmin power supply and was pleased to find familiar chip inside. So if you want to go the same route, go to your supermarket or wherever cheap phone accessories are sold and look for car charger with type identifier PC-252A. It should look something like this:

It has 2A fuse on a nozzle and a two-color LED on it (they are so proud of both features that they'll surely advertize it, whatever brand name it carries.
Contrary to what the product page says this charger has absolutely no protection circuity, not even the reverse protection diode. It is just the above circuit without D2,C1,L1,L2 with trickle charger generator and charge current detector added (built from discrete components). To modify it for Garmin eTrex power supply with serial connector and add some protection, you need to spend about $2 for additional parts. You need
| RS-232 connector (female, 9 or 25 pins as needed) with housing if possible | 1 |
| 1N4007 diode | 1 |
| 3.3 Ohms 0.5W resistor | 1 |
| TVS diode, our local electronics shop did not have any so I used 5W 18V zener, still better than nothing | 1 |
| 1.6 kOhms resistor | 1 |
Basically, this mod changes the resistor in feedback loop to lower the output voltage of switcher from 10V to 3V and removes or isolates all battery charging circuity. Images of the completed design coming up as soon as I get the GPS and cable back from my friends who took those to the skiing trip. Hopefully the power plug and eTrex survive the field test.
Open the charger up (pry carefully along edges, it comes apart quite easily). You can fit both the 3.3Ohm resistors and 1N4007 alongside C1, you'll need to drill holes for them and cut the track underneath to get them wired in series with fuse. While at it, find R8 underneath the board and drill holes so that you can add 1.6K resistors in parallel with it. Now desolder Q1,Q5,R2,R6,R7,R14,JP1 and output power cord. Yank the collar off the cord so that you can use it on you new, longer and softer cable (I used 4 wire cable commonly used for security installations). Solder the anode end of TVS to hole left from JP1 (that goes to ground) and kathode end directly to pin 6 of MC34063A. Now solder a piece of wire from where Q1 emitter was to positive output terminal. Desolder R11 and resolder it to where R2 used to be (this is lower value resistor so that the green led will light up with lower output voltage). This is it, hook it up to 12V and check that there is 2.9..3.1V output voltage between ground and positive output terminal. You can then solder the new cable to the board and reassemble the plug. The result is nice looking and can easily supply 250mA without any of the components heating up. LED is enough to keep in in good regulation without load, too. The switcher chip is short circuit protected and 1N4007 protects the plug itself from reverse polarity. The aim is to create a circuit that looks like this:
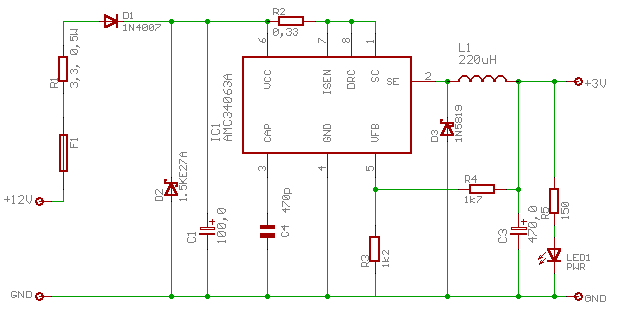
The actual value of R3 and R4 can be different, these set the output voltage. The formula is Vout=1.25(1+R4/R3). C4 sets the minimum switching frequency, this depends on the inductor used and various other things. Data sheet says that 1nF gives about 33kHz, if you are modifying the phone charger, then just keep whateveris there. You can also experiment with values on my MC34063A design aid page.
Links to other interesting sites
- Garmin
- Larry's Pplug & ePlug
- eTrex fan & tuning site
- OziExplorer, mapping software that works with your eTrex
- Joe Mehaffey and Jack Yeazel's GPS Information Website
- List and download links of GPS software (in French)
Tips and suggestions from visitors
Subject: Another suitable eTrex car power cable Date: Sat, 2 Jun 2001 12:30:27 -0400 From: Markus Wandel <markus@pinetree.org> To: mast@nomad.ee Thanks for your eTrex car power cable page! I came across a Sony Discman car power cable (4.5V) and found a circuit inside that looked familiar. I was able to spot the voltage setting resistors, and simply parallel another resistor to R4 to reduce the voltage. Works great and looks good. Markus
Subject: Power source for Garmin etrex Date: Mon, 18 Jun 2001 16:37:37 +0200 From: "Daniel Dicke" <daniel@derdicke.de> To: <mast@nomad.ee> Hi I found your website about modifying a power source for cellular phones to a power source for a garmin etrex gps reciever. I have modifyed such a power source, wich was originally made for a Siemens M35i cellular phone and it works fine. Because of the vibrations of my Motorcycle i added some hot-glue on the upper side of the board to make it more reliable. I think most of the "cheap type" power sources for cellular phones avaliable in germany are good for a projekt like this. Thank you for that great idea for a cheap power source. Greetings Daniel Dicke daniel@derdicke.de
Subject: Power source for both Etrex & Nokia mobile phone. Date: Wed, 1 Aug 2001 18:01:59 +0800 From: "Mark Joss" <mjoss@iinet.net.au> To: <mast@nomad.ee> G'day, I found your "Hacking Etrex" site to be very helpful but none of the suggestions suited my needs. They did however lead me to the following idea. I already had a Nokia 6150 and a switching car charger of the PC-xxxx variety. It provides 6 volts to the nokia and I also wanted it to provide the 3.15 volts for the Etrex. My solution was to add the linear regulator circuitry to the back of the switching circuit and run a second power cable to the Etrex. In this way It reduces the heat output of the regulator and also allows me to run either or both simultaneously from just the one 12v socket. Only cost to me was for the eplug & a voltage regulator. Hope this is of help to others not wanting to run separate cables. Thanks for your help and good luck to others visiting your site. Mark.