AVR micro as car battery monitor.
I am a proud, masochistic owner of a car made by Ford. That itself should answer the question why I am interested in battery voltage monitoring. For those not familiar with Fix Or Repair Daily syndrome, here is a story.
When I bought the car (secondhand, but well kept) everything worked except one thing - the alternator light would come on every once and a while. The charging voltage was OK, it was just the light acting funny. When I took the car to a routine maintenance, I complained about the alternator light, too. When I got it back, they explained that it was a problem related to climate control (!) and they have to make modifications to dash wiring to make the light work properly. So I had them do it, and sure enough, the light was not blinking on and off after that. In couple of weeks tach needle started acting funny. So I went back and explained the new problem to them. On about the third try, they finally decided that it was a problem related to alternator (!) and made some more wiring changes - which did not help much at all.
Well, enough is enough, I thought, and learned to ignore the wildly jumping tach. Couple of months later the alternator gave up on me, with the alternator warning light never coming on. The car was towed to another Ford shop, and after installing the $450 replacement alternator, they explained to me that someone had really messed up the wiring and they had to spend a lot of time fixing it. And that the alternator warning light does not work because there is a broken diode in dashboard - easy to fix by installing a replacement dashboard electronics module, $900. Thanks, NO!, I said.
So now I had a car with non-working tach and alternator light. I drove like that for about a year, during which several other things broke. When I finally had enough, I used a good part of a month to get everything fixed. That included the tach which I finally fixed myself - by repairing cracked dashboard PCB (did you know that in '95 Scorpio they designed 3 large microcontrollers just into dashboard alone?) ! One thing that I did not get to work was an alternator light - every part seems to be OK, so its probably some of the wiring changes that the other Ford shop 'missed'. And I am not masochistic enough to tackle that mess.
So, a replacement alternator lamp then. A comparator, LED, zener, and couple of resistors would do the trick - but with zero coolness. And I just started playing with AVR micros which include the analog comparator. So I built the one shown below - 3 LEDs, 3 times the coolness :)
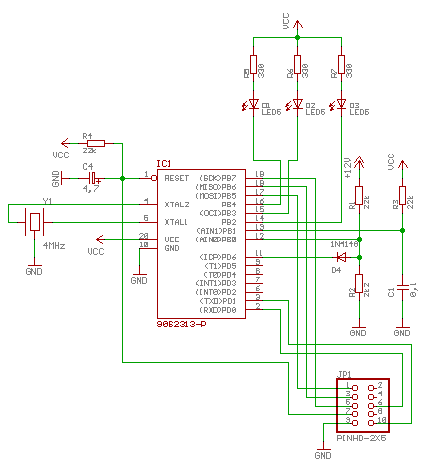
It is all pretty straightforward stuff. An AVR micro, 3 LEDs hooked to I/O pins, programming connector for my AVR programmer/development board, and then the real thing. R1/R2 are a voltage divider with 1:10 ratio, so 12V input will result in 1.2V at AIN0. C1 is a timing capacitor which is charged to VCC via R3. C1 is discharged, and then the time to reach voltage on AIN0 is measured by looking for change on comparator output. If a voltage on 12V rail rises, it will take longer to reach the trip point. Lower voltage means that the trip point will be reached in shorter time. C1 is a critical component, cheap ceramic ones are very temperature sensitive. Using expensive polymer capacitors would help, but I took a different route. Forward drop of D4, a small signal diode, is used as reference voltage to calibrate a system. When PD6 is pulled low, Voltage on AIN0 cannot rise higher than the reference voltage, and we will measure just the reference. This will be below 700 mV which is a limit, as the 78L05 will drop out of a regulation at 7V input anyway.
12V input comes from power supply which is also pretty simple:
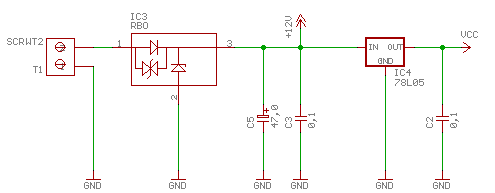
IC3 is a specialized component (full ST part number is RBO40-40T) which provides protection against overvoltage, high voltage spikes, reverse voltage and even huge load dumps that are all commonplace in car electronics. The internal diode has a voltage drop, but it does not matter, as we will calibrate the system anyway. 78L05 then provides +5V power for a circuit.
The system can be calibrated by programming the chip, applying a know voltage (like 12V) to unit and looking at the serial output (set your terminal to 19200,8N1). On the terminal, you will see values for C, X and V. C is a count for reference voltage, X is count for input voltage, and V is what the code thinks the voltage at input is. It probably wont be very accurate at first try. Compenstate by calculating Vcal value by doing Vcal=(C*Vin)/X. The result will not be an actual forward drop voltage, but a value that will yield a correct result, compensating for voltage drop on IC3. Change the Vcal constant, and reprogram the chip. You should now see a V value that is pretty close to actual voltage on input.
I wrote the code for it using demo version of Bascom-AVR from MCS electronics.
$crystal = 4000000 $baud = 19200 Declare Function Readv() As Byte Declare Function Readcal() As Byte Declare Sub Show(byval V As Word) 'calibration voltage on diode, in mV Const Vcal = 490 'these are voltage trip points, in 10 mV units ' ' 7-11.5V Yellow LED blinks ' 11.5-12.5V Yellow LED is on ' 12.5-14.5V Green LED is on ' 14.5-15.5V Red LED is on ' 15.5-28V Red LED blinks ' Const Yblink = 1150 Const Yellow = 1250 Const Green = 1450 Const Red = 1550 'set initial IO state Config Portb = Output Config Portd = Output Portb = &HFF Portd = &HFF Dim Voltage As Word Dim I As Byte Dim J As Byte Dim Cal As Byte Dim L1 As Long , L2 As Long Mainloop: 'take average of 10 calibration readings ' Voltage = 0 For I = 1 To 10 J = Readcal() Voltage = Voltage + J Next I Voltage = Voltage / 10 Cal = Voltage 'take average of 10 voltage readings ' Voltage = 0 For I = 1 To 10 J = Readv() Voltage = Voltage + J Next I Voltage = Voltage / 10 I = Voltage 'now, calculate a real voltage L1 = Voltage L2 = Vcal L1 = L1 * L2 L2 = Cal L1 = L1 / L2 Voltage = L1 ' Print "C: " ; Cal ; " X: " ; I ; " V: " ; Voltage 'now show the voltage status on leds Call Show(voltage) Waitms 200 Goto Mainloop 'shows a voltage status on LEDS ' Sub Show(byval V As Word) If Voltage < Yblink Then 'severe undervoltage, blink yellow led Portb.3 = 1 Portb.4 = 1 If Portb.2 = 1 Then Portb.2 = 0 Else Portb.2 = 1 End If Else If Voltage < Yellow Then Portb.2 = 0 'not charging, light up yellow Portb.3 = 1 Portb.4 = 1 Else If Voltage < Green Then 'charging, show green Portb.2 = 1 Portb.3 = 0 Portb.4 = 1 Else If Voltage < Red Then 'overvoltage, show red Portb.2 = 1 Portb.3 = 1 Portb.4 = 0 Else 'severe overvoltage, blink red Portb.2 = 1 Portb.3 = 1 If Portb.4 = 1 Then Portb.4 = 0 Else Portb.4 = 1 End If End If End If End If End If End Sub Function Readcal() As Byte Portd.6 = 0 Ddrd.6 = 1 Waitms 1 'now the voltage on ain0 cannot exceed the diode drop Readcal = Readv() Ddrd.6 = 0 End Function 'to read a voltage on ain0, we first discharge a capacitor 'on ain1, then switch the pb.1 to input and wait for comparator 'to flip when the raising voltage on capacitor rises higher than 'reference on ain0 ' Function Readv() As Byte Dim Z As Byte Dim Ai As Bit 'set pb.1 output, and pull it low Portb.1 = 0 Ddrb.1 = 1 Ddrb.0 = 0 Waitms 1 'cap should be empty now Ai = Acsr.5 Z = 0 Portd.5 = 0 'debug indicator Ddrb.1 = 0 'start charging 'this is a main timing loop, the precision of 'measurements depends on it. we are currently using 'a byte value, and the granularity really hurts. 'this should really be converter to assembly, 'using 16-bit counter While Z < 255 If Acsr.5 <> Ai Then Exit While Incr Z Wend Portd.5 = 1 'debug indicator Readv = Z End Function